


 | Gaming Laptops")


From ancient barter systems to modern cash, cards, and bank transfers, payment methods have gotten increasingly practical throughout time. Still, there is no limit to the progress. Virtual cards, which allow you to perform transactions without the real, plastic equivalent, are one of the most recent payment advancements. These cards, which might be debit or credit cards, are held in digital wallets.
Google new virtual card feature alters the traditional virtual card’s functionality. It is tied to your physical card rather than a separate card linked to your bank account or digital wallet. When you use your physical card to make an online transaction, the function substitutes your actual card number with a unique virtual card number, shielding your true information from retailers. Continue reading to find out how to generate and utilize Google virtual card on your PC or high-end 5G phone.
How is Google virtual card work?
When making online transactions, the virtual card function generates a new number that replaces your physical card number. However, the underlying idea differs. Some card issuers give you a single virtual card number for all purchases, however the CVC/CVV varies every retailer. Meanwhile, some issuers provide you a unique virtual card number for each new merchant you visit.
- Best VPN for Netflix and Amazon Prime in 2025
- Best Free VPNs for Streaming Movies and TV Shows in 2025
- Why Sonos Really Can’t Afford to Fall Behind on AI Music
- iPhone 16 price report: How much will it cost?
- The Price and a Few Great Things you need to know about The New Oneplus 12R
How to create a virtual card on Google Pay
When making online transactions, the virtual card function generates a new number that replaces your physical card number. However, the underlying idea Dias beneficial as Google virtual card function is, it is not available to everyone. This is due to a number of factors. To begin with, the functionality is presently only accessible in the United States. Furthermore, your hardware card must support the feature. If you live in the United States, you may activate a Google virtual card on your phone or computer by following these instructions :offers. Some card issuers give you a single virtual card number for all purchases, however the CVC/CVV varies every retailer. Meanwhile, some issuers provide you a unique virtual card number for each new merchant you visit.
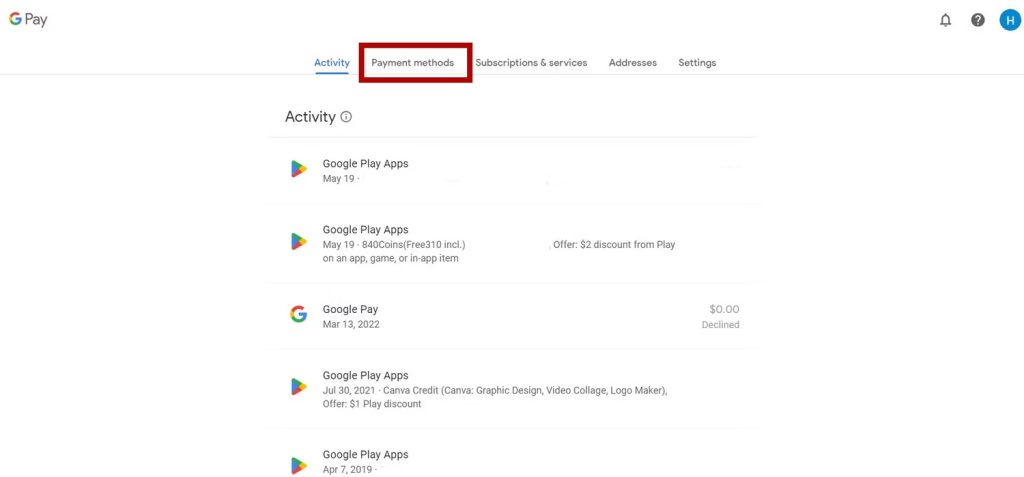
- Go to the Google Pay website at pay.google.com on your Chrome web browser.
- Navigate to the Payment methods tab at the top of the screen.
- Find the card for which you want to create a virtual number.
- Select Turn on virtual card. This option is only available if the card supports the feature.
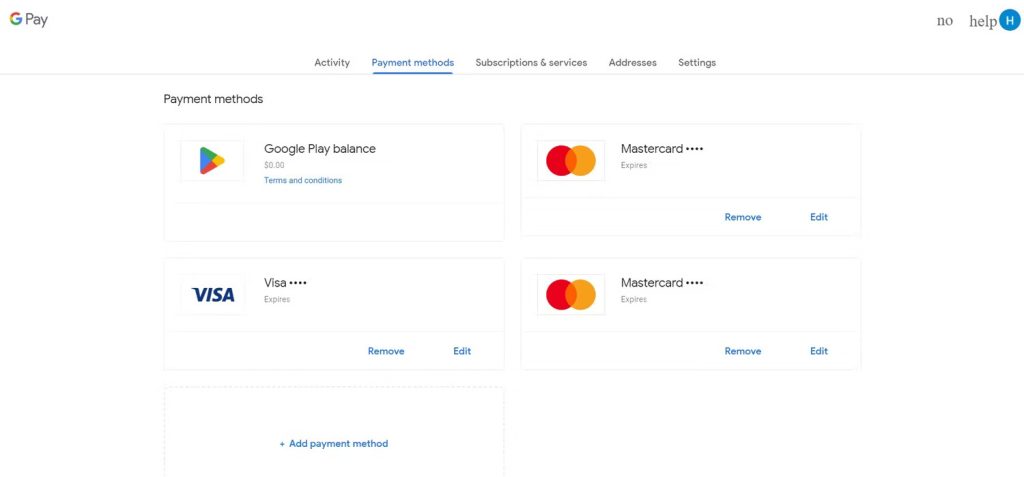
- Click Turn on.
- Click Got it.
The screenshots show the process of turning on a virtual card on a laptop, but the mileage is similar on Android. The only difference is that you need to open a hamburger menu to see the Payment methods option.
How to use a virtual card with Google Pay
Following the creation of your virtual card, follow these steps to use it for various sorts of transactions.
Online purchases
When shopping online, you may use the Google Pay virtual card to make purchases fast, securely, and effectively. The option to autofill your virtual card for payment is normally available on the checkout page of a compatible website. If it does not show, continue the procedures in the preceding section to check the card details and manually enter it.
apps purchase
In-app purchases or subscription services are available in many applications, including the Google Play Store. When you make a purchase on such platforms, the Google Pay option appears, and you may use your virtual card to complete the transaction.
There are no costs for using Google virtual card. Your bank or payment network, such as Mastercard, Visa, or American Express, may, nevertheless, withhold regular transaction fees.
How to turn off a virtual card
If you choose to deactivate your card for whatever reason, follow these steps:
- Visit pay.google.com on Google Chrome or open the Pay app on your phone.
- Select Payment methods.
- Click Turn off at the bottom of the screen. A confirmation pop-up appears.
- Select Turn off to confirm.
- Click Got it. The card is no longer active.


