


 | Gaming Laptops")


If you’ve installed iOS 15 or iPadOS 15 through Apple’s developer program or the public beta now it’s been released, you may decide you want to downgrade because of usability or stability issues. Keep reading to learn how it’s done.

Apple usually only releases the public betas of iOS and iPadOS once the developer versions are relatively stable. That said, Apple’s beta versions of its major software updates can be notoriously buggy, especially the early releases.
You may find apps not working properly, poor battery life, device crashes, and features that don’t do what they’re supposed to. Fortunately, you can restore your iPhone or iPad to the previous version of iOS.
If you made an archived backup before you installed the beta, you can remove the iOS 15 beta and restore the backup. If you didn’t make a backup, you can still downgrade, but you won’t be able to restore your device to its original state before you upgraded.
Also, if you’ve installed watchOS 8 on your Apple Watch, it’s important to note that you won’t be able to use it with your iPhone once you’ve gone back to iOS 14. And downgrading an Apple Watch to a previous version of watchOS can’t be done manually either – if you want to remove watchOS 8, you’ll have to send your watch into Apple.
How to Downgrade from iOS 15 or iPadOS 15
- Launch Finder on your Mac.
- Connect your iPhone or iPad to your Mac using a Lightning cable.
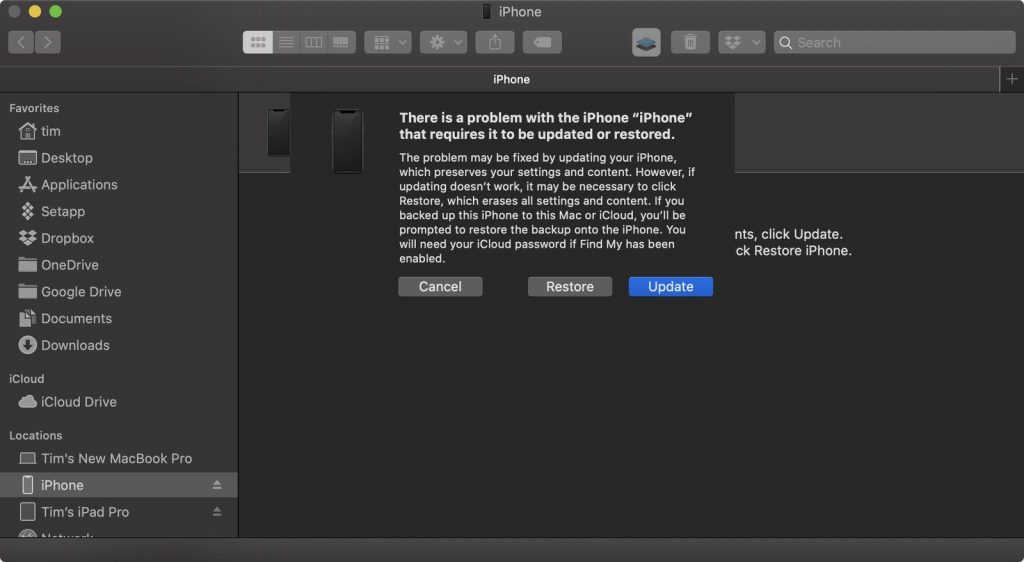
- Put your device into recovery mode. The method of doing this depends on your device, so check the list below these steps to find your model. Apple also provides more information on Recovery mode in this support article.
- A dialog will pop up asking if you want to restore your device. Click Restore to wipe your device and install the latest public release of iOS or iPadOS.
- Wait while the restore process completes.
How to Enter Recovery Mode on Your iOS Device
- iPad models with Face ID: Press and quickly release the Volume Up button. Press and quickly release the Volume Down button. Press and hold the Top button until your device begins to restart. Continue holding the Top button until your device goes into recovery mode.
- iPhone 8 or later: Press and quickly release the Volume Up button. Press and quickly release the Volume Down button. Then, press and hold the Side button until you see the recovery mode screen.
- iPhone 7, iPhone 7 Plus, and iPod touch (7th generation): Press and hold the Top (or Side) and Volume Down buttons at the same time. Keep holding them until you see the recovery mode screen.
- iPad with Home button, iPhone 6s or earlier, and iPod touch (6th generation) or earlier: Press and hold both the Home and the Top (or Side) buttons at the same time. Keep holding them until you see the recovery mode screen.
Once you’ve followed the above steps, you can restore a backup of your device from iOS 14 or iPadOS 14 using your Mac or iCloud.
How to Downgrade iOS & Return to the Previous iPhone Software
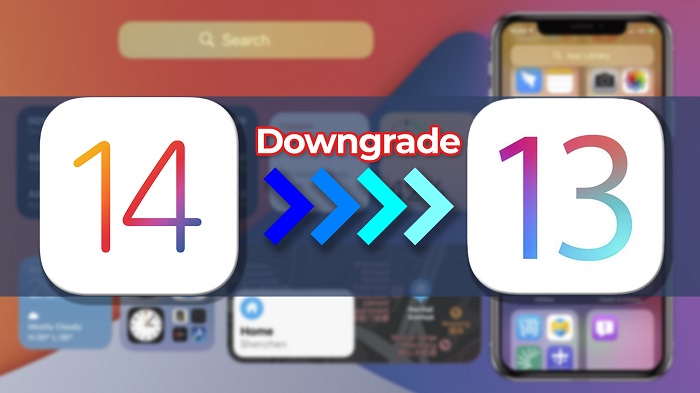
If your iPhone is running on, especially an earlier version of iOS 14, you could be experiencing battery draining fast, broken Wi-Fi, hefty storage consumption, or any other bugs and glitches. To fix this problem, you’d want to downgrade iOS 14 to 13 without losing important files and data.
Therefore, this blog goes over three ways you can downgrade iOS 14 to 13 without losing data.
Before Downgrade iOS 14 To 13, Keep These in Mind
- Fully backup your iOS 14 device to iCloud before proceeding with downgrading as this will prevent loss of data.
- Apart from backing up to iCloud, use a tool like AirDrop or iCloud drive to copy important files and documents to your Mac computer, if you have one.
- If you have an Apple watch that is running on the watchOS 7 Beta, downgrade it to watchOS 6 before proceeding with this guide. WatchOS 7 is not compatible with iOS 13; hence, you won’t be able to use your wearable once you revert to iOS 13.
- Ensure your Mac computer is up to date and install the latest version of the iTunes app on your Mac as well.
Step 1: Find Your iPhone Model
To downgrade your iOS version, you’ll need to know your iPhone Model so you can select the proper software to download. If you already know your iPhone Model (such as iPhone 13, or iPhone 12 Pro Max), you can skip this section and move to the next. If you’re unsure about which iPhone you have, follow the steps below to quickly find your iPhone Model.
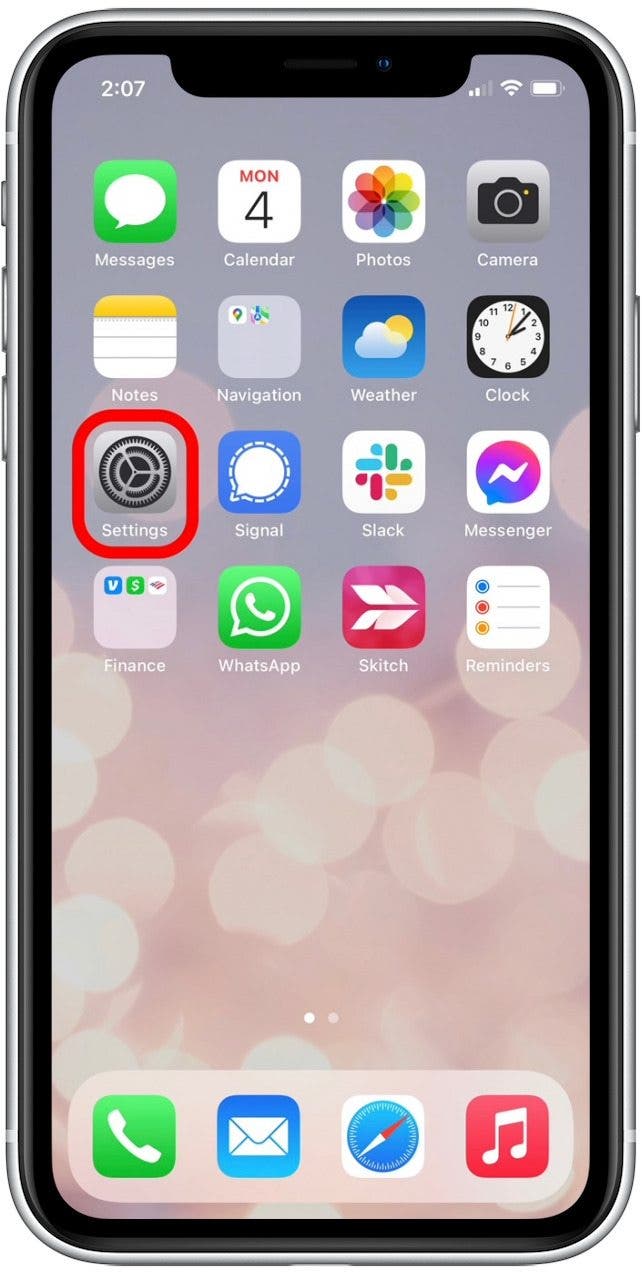
- Open the Settings app.
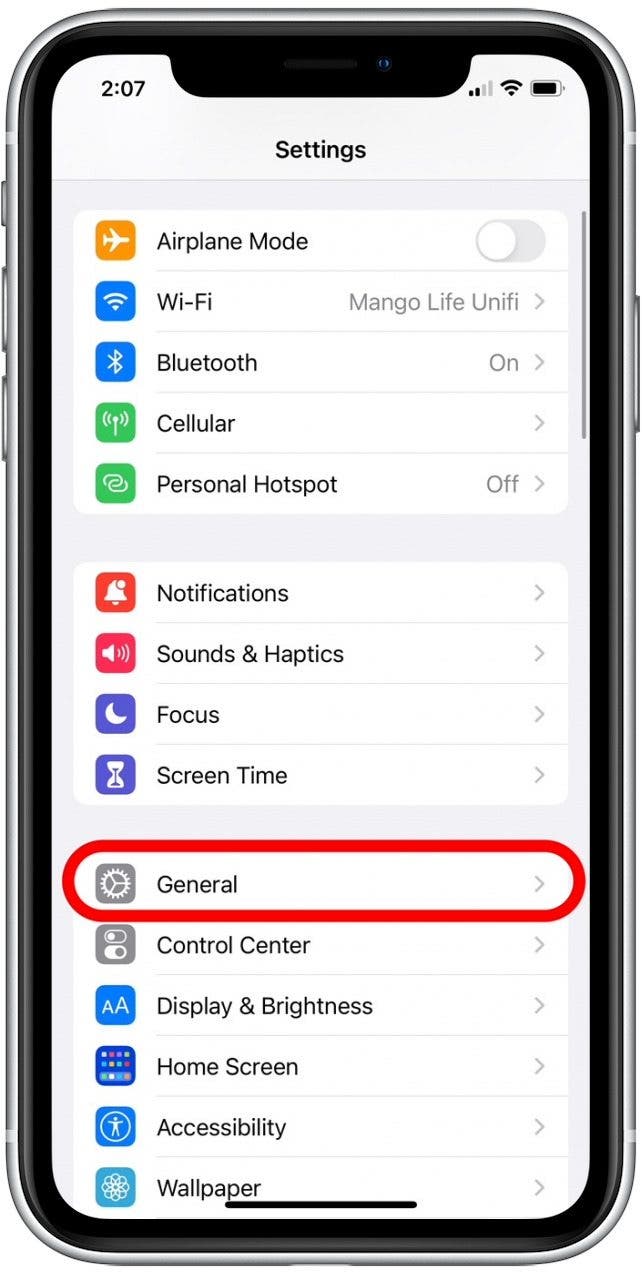
- Tap General.
- Tap About.
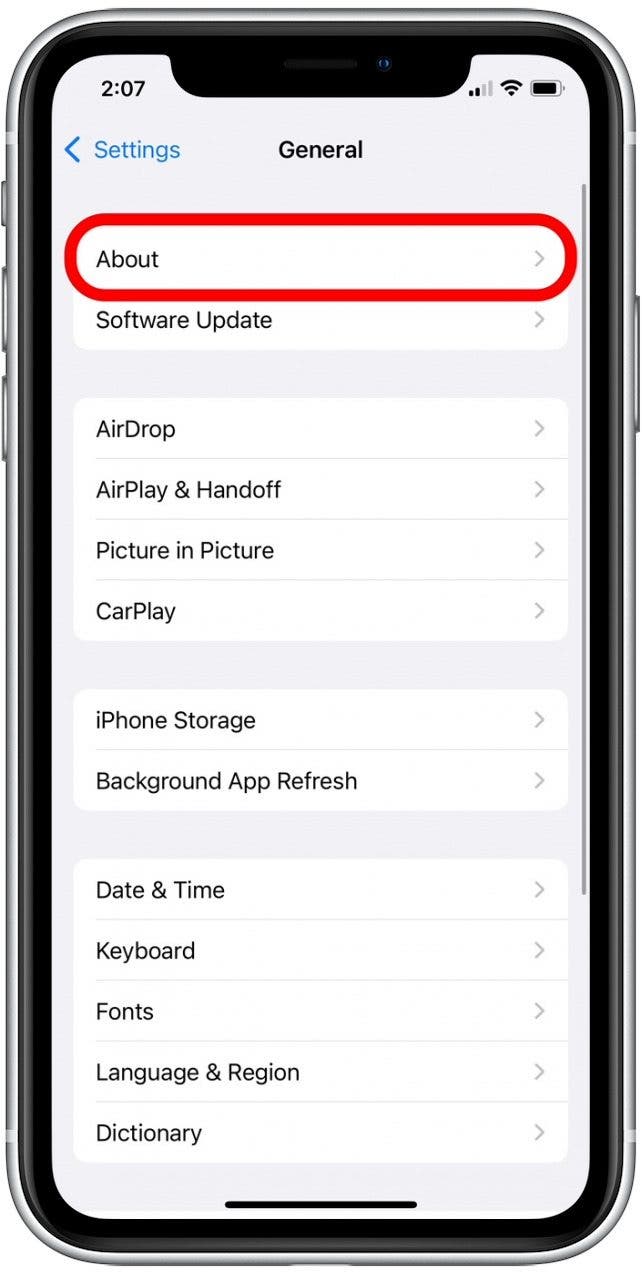
- You’ll see your iPhone model listed next to Model Name.

Step 2: Create a Full Backup of Your Data
Before getting started, I recommend creating a full backup of your iPhone data to iCloud or to your computer. As noted above, you cannot use the latest iOS backup when you downgrade, but this extra backup acts as an additional safety measure. By creating the backup, you can fully restore your data if you change your mind after downgrading the software and want to reinstall the latest version of iPhone software. When in doubt, I find it is always better to have extra backups.
Step 3: Download IPSW File to Computer
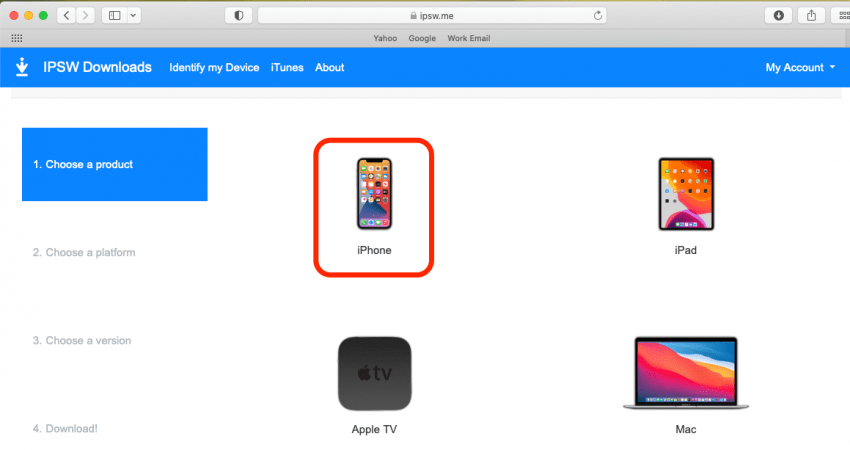
The next step is to download the previous iOS for your model of iPhone. Apple does not offer downloads of older versions of software, so I recommend using this site, which provides the downloads for free.
- Click the site link listed in the paragraph above.
- Select iPhone from the device list.
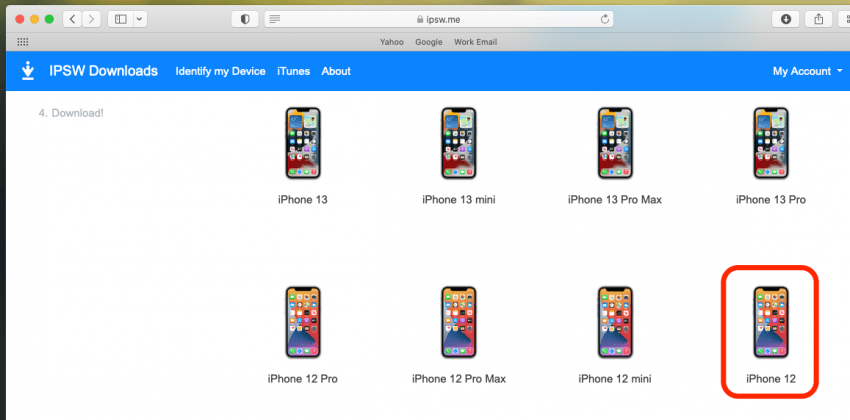
- Select your iPhone Model.
- Select the earlier software version you’d like to downgrade to.
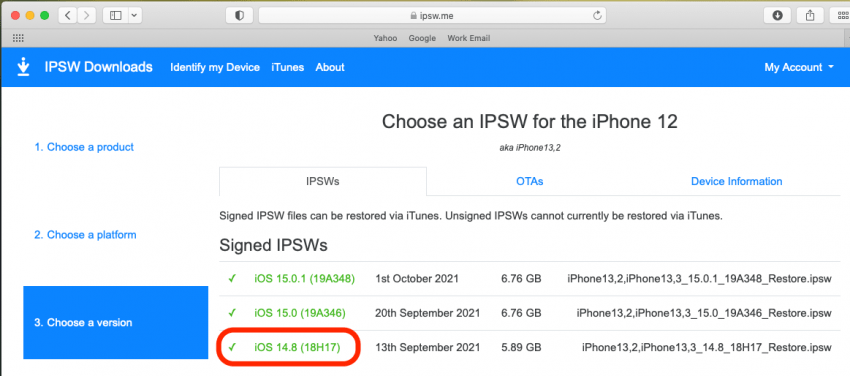
- Click Download.
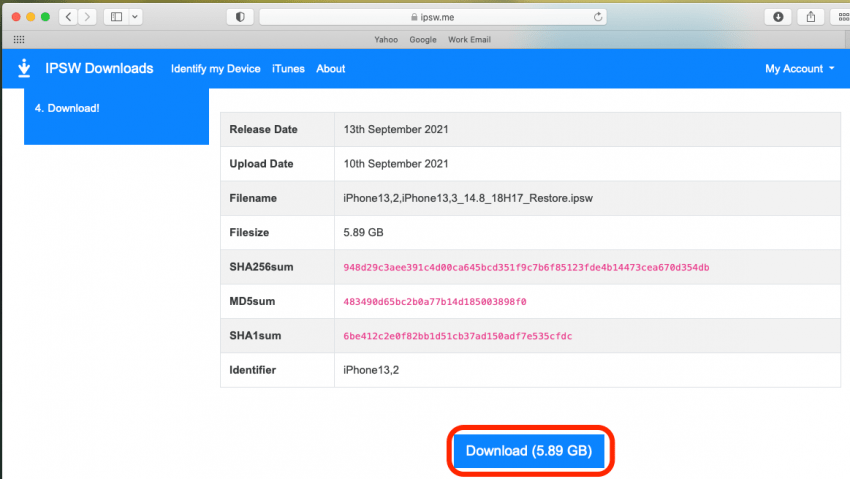
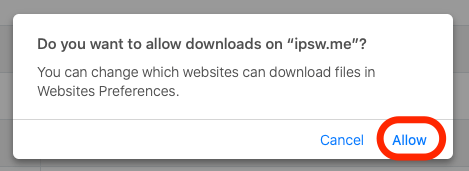
- Click Allow to confirm the download.
A .ispw file will be downloaded. You can either keep this file in your Downloads folder or move it to your desktop so you can more easily find it in the steps below.
Step 4: Prepare Your iPhone to Downgrade iOS
Now, we’ll prepare your iPhone for the iOS downgrade. To do so:
- Connect your iPhone to your PC or Mac using a Lightning cable.
- Place your iPhone in Recovery Mode using the method described in the section below.
How to Place Your iPhone in Recovery Mode
Once in Recovery Mode, you’ll lose any data from your time with the latest iOS, so if you want to create a backup, you’ll need to do that before following the steps below.
- iPhone 8 or later, including iPhone SE (2nd generation): Press and quickly release the volume up button. Press and release the volume down button. Then, press and hold the side button until you see the recovery mode screen.
- iPhone 7: Press and hold the Volume Down and Power buttons until you reach the recovery mode screen.
- iPhone 6s or earlier: Press and hold the Home button and Power button until you reach the recovery mode screen.
Step 5: Restore Device to Downgraded iOS Version
Remember that ISPW file we downloaded? Now we’re going to make use of it as we restore your device to the previous software. With your iPhone still connected to your computer, follow the steps below:
- If you’re using macOS Catalina or later, open Finder and click your iPhone in the sidebar. (Open iTunes if you’re using a PC or a software older than macOS Catalina.)
- Hold the Shift key (PC) or Option key (Mac) and click the Restore button.
- Select the .ipsw file you downloaded earlier.
- Click Open.
- Click Agree to accept Apple’s Terms and Conditions.
The process to restore your device will begin and will take about 15 minutes.
Step 6: Restore Backup on iPhone
Once your iPhone has been restored, it’ll feature a clean copy of the earlier iOS version you downloaded. To get your texts, apps, and other data back onto the phone, you’ll have to restore from a backup. As mentioned earlier, you can’t restore from a backup made after your latest iOS update, so you’ll need to use an older backup. Here’s how to recover an iPhone backup:
- If you’re using macOS Catalina or later, open Finder and click your iPhone in the sidebar. (Open iTunes if you’re using a PC or a software older than macOS Catalina.)
- Select Restore Backup.
- Select the iOS backup you’d like to restore. (Make sure it is the correct one by looking at the date of the backup.)
- If you’re restoring from an encrypted backup, enter your password when asked.
Keep your device plugged into your computer while the restore process finishes. When it is done, your iPhone will be running your selected version of the software and you’ll have all data up to the time of your restored update.
4k smart tv Amazon fire tv stick apple apple airpods Apple Watch 6 black Friday Deals 2020 CES 2021 Cyberpunk 2077 CYBERPUNK 2077 NEXUS MODS Epic Games fortnite Fortnite Season 4 fortnite season 5 Fortnite season 6 games Gaming Laptop GTA 6 gta 6 release date ios 16 iphone12 iphone 12 pro iPhone 12 Pro max iPhone 13 iphone 14 iphone 14 release date iphone 15 iphone 15 pro mobile Netflix Nvidia OnePlus ps5 ps5 games 2021 ps6 ps6 release date RTX 3080 samsung Samsung Galaxy S21 samsung Galaxy Watch 3 smartwatch xbox xbox game pass Xbox One Xbox Series X|S Xiaomi


